2. Framework Overview
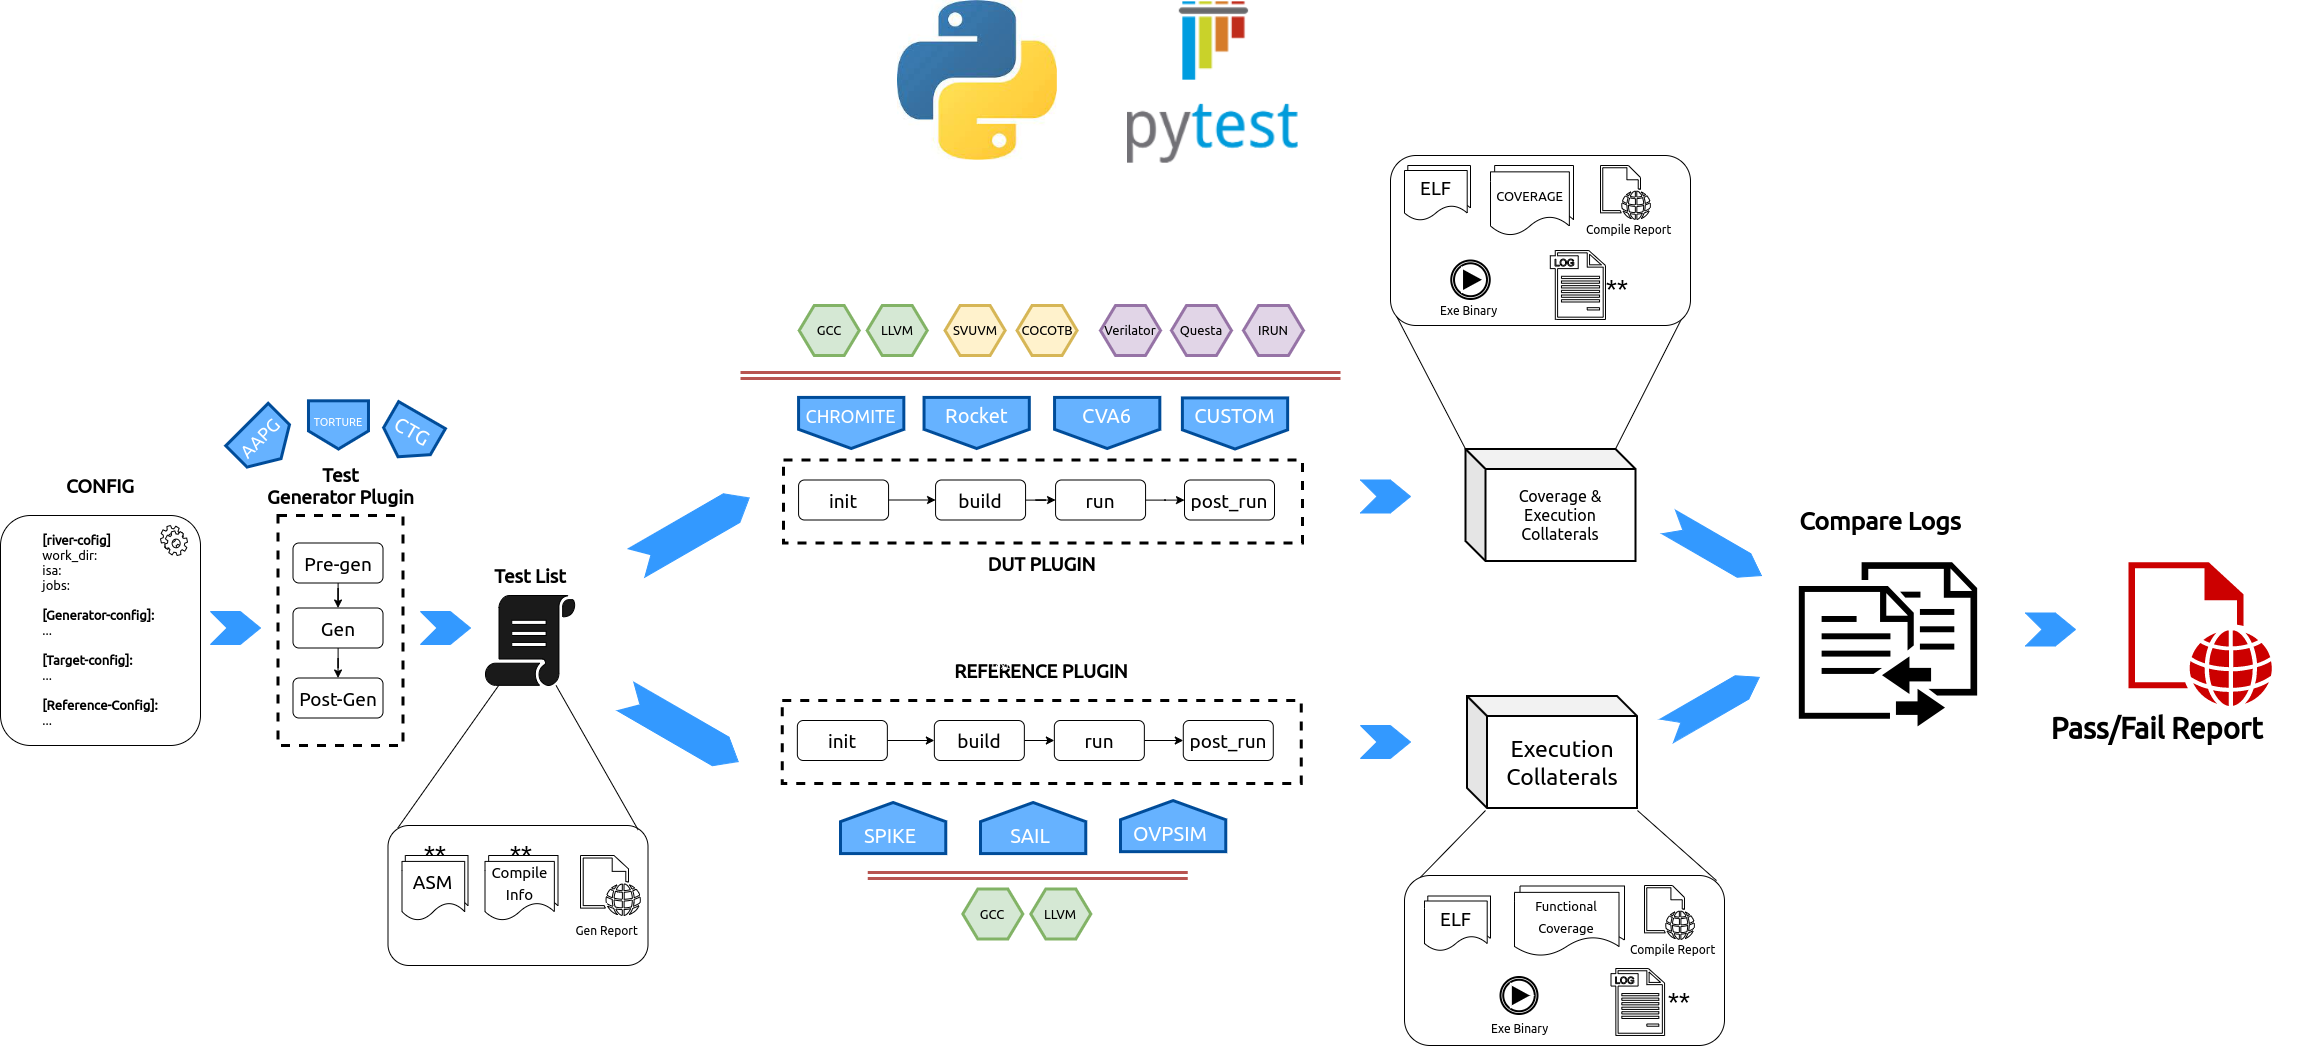
Fig. 2.1 RiVer Core Overview Flow
RiVer Core splits the verification flow into the following stages:
Test Generation: This phase uses multiple user configured generators of different kind to generate tests and create a combined test-list. This now becomes a sort of a regression suite that needs to be run on the target and the reference.
Target Run: The generated tests from the previous stage are compiled and loaded into the target’s custom test-bench and simulated. The execution logs for each test are saved. All of the above steps are encapsulated inside a python plugin and thus any core with any environment can easily be integrated into RiVer Core as a target.
Reference Run: The same tests are compiled and run on the reference model of choice and the execution logs are saved.
Compare Logs: The execution logs for each test from the target and the reference model are compared and a Fail result is captured is the logs are different.
Report Generation: Generate an html report capturing the results of all of the above steps.
RiVer Core uses the Pluggy python package to manage plugins. Additionally, RiVer can be stopped at any of the points above allowing the user to diverge to a custom flow using any of the artifacts of interest.
2.1. The Input Config File
The entire configuration and flow of the framework is controlled via the input
config.ini file. This file is used to capture some of the following
parameters:
The work directory where all artifacts of generation and simulation are kept.
The overall ISA string supported by the target
The list of generators to be used and their configurations to generate tests.
Configuration parameters of the Target. This is particularly useful when working with core generators
Configuration parameters of the reference model.
Whether coverage should be enabled by the target and if so, what metrics ?
A sample template of the config.ini file is shown below. More details of syntax can be found here Config Spec.
work_dir = test

target = chromite_verilator
reference = spike
generator = testfloat, aapg
isa = rv64imafdc

# Set paths for each plugin
path_to_target = ~/river_core_plugins/dut_plugins
path_to_ref = ~/river_core_plugins/reference_plugins
path_to_suite = ~/river_core_plugins/generator_plugins

open_browser = True
space_saver = True

[coverage]
code = False
functional = False

[testfloat]
jobs=8
seed = random
count = 1
filter =
config_yaml = ~/river_core_plugins/generator_plugins/testfloat_plugin/testfloat_gen_config.yaml

[aapg]
jobs = 8
filter = rv64imafdc_hazards_s
seed = random
count = 2
config_yaml = ~/river_core_plugins/generator_plugins/aapg_plugin/aapg_gen_config.yaml

[chromite_verilator]
jobs = 8
filter =
count = 1
src_dir = ~/chromite/build/hw/verilog/,~/bsc/inst/lib/Verilog,~/chromite/bsvwrappers/common_lib
top_module = mkTbSoc

[spike]
jobs = 1
filter =
count = 1
2.2. Generator Plugin
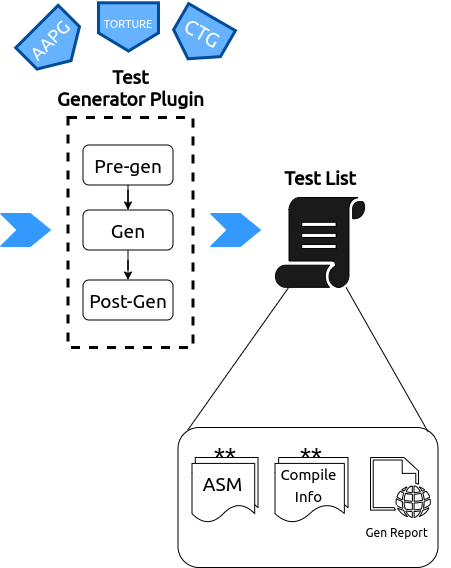
Fig. 2.2 Generator Plugin
This plugin is used encapsulate various test-generators. These generators can be either random program generators like AAPG, RISC-V Torture , CSmith , MicroTesk , Test Float etc. OR may include a directed test-generators like CTG OR a static test suite like the ones hosted at the RISC-V TESTS .
Each test generator is a python plugin which supports 3 hooks, called in the following sequence:
Pre-gen: This stage is used to configure the generator, check and install dependencies, download artifacts, create necessary directories, parse and capture the plugin specific parameters present in the
config.inietc.Gen: This stage is where the actual tests are generated. RiVer Core uses the inherent pytest framework to run parallelized commands. Using pytest, enables using default report templates which are quite verbose and helpful in debugging as well.
The major output of this stage is a test-list YAML which follows the syntax/schema mentioned in Test List Format. this test list capture all the information about the test and necessary collateral required to compile each test. By adopting a standard test-list format, we inherently allow any source of tests to be integrated into RiVer CORE as a generator plugin as long as a valid test list is created.
Post-Gen: This stage is called after all the tests are generated and can be used to post-process the tests, validate the tests, profile the tests, remove unwanted artifacts, etc.
At the end of the 3 phases RiVer Core also generates an HTML reports which captures the log of each test generation and any errors that were caught, thereby providing a complete database of information on the test-generation aspect.
The generated tests are available in the directory mentioned in the work_dir
parameter of the config.ini file passed to the generate command.
Warning
It is not advised to modify the tests or directory structures in the the work_dir manually.
The plugin hooks usage and arguments are presented below:
2.3. DUT/Target Plugin
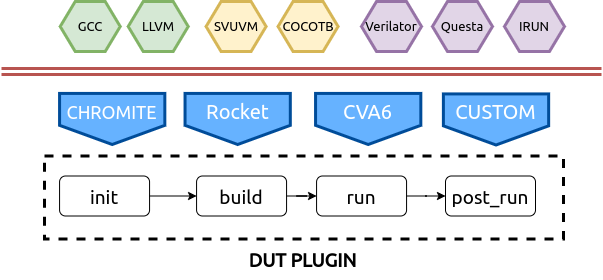
Fig. 2.3 DUT/Target Plugin
This plugin encapsulates the DUT’s/Target’s compile and test environment. The plugin allows a user complete control over:
choice of toolchain to be used for compiling the tests: GCC, LLVM, Custom, etc
choice of test-bench environment : SVUVM, Cocotb, etc.
choice of simulator : Questa, Cadence, Verilator, etc
choice of coverage metrics to enable: functional, structural, etc
The DUT Plugin supports the following hooks:
Init: This stage is used to capture configurations from the input
config.iniand build and set up the environment. If a core generator is the target, then this stage can be used to configure it and generate and instance, build the relevant toolchain, setup simulator args like coverage, verbosity, etc. The test list is also available at this stage. Which must be captured and stored by the plugin for future use.Build: This stage is used to create a Makefile or script to actually compile each test, simulate it on the target. A typical use case is to create a makefile-target for each test that needs to be run on the target.
Note
The target must run all the tests in the test-list provided and should not perform any filtering and skip any tests and should neither modify the tests
Run: This stage is used to run the tests on the DUT. It is recommended to run the tests in parallel. RiVer Core uses the inherent pytest framework to run terminal commands in parallel fashion. This stage will generate all the artifacts of the simulation like : signature file, execution logs, test-binary, target executable binary, coverage database, simulation logs, etc.
Post-Run: This stage is run after the pass-fail results have been captured. This stage can be used to clean up unwanted artifacts like : elfs, hexfiles, objdumps, logs, etc which are no longer of consequence. One can further choose to only delete artifacts of passed tests and retain it for tests that failed (the pass/fail result is captured in the test-list itself).
This stage can also further also be used to merge coverage databases of all the test runs, rank the tests and generate appropriate reports. This is completely optional and upto the user to define what happens as a “clean-up” process in this stage.
The plugin hooks usage and arguments are presented below:
2.4. The Reference Plugins
The reference plugins use the same hooks and class as the DUT/Target plugins. Similar operations as mentioned above are performed for the reference plugin. However, in terms of coverage, certain reference models may have capabilities to generate certain functional coverage metrics. This can be exploited in these plugins as well.
2.5. Compare Outputs
In order to declare the tests have passed, the execution logs from the DUT/Target and the reference models are compared. A difference in the logs indicates the test has failed, else it has passed. The result of the tests is updated in the test-list itself.
Note
RiVer Core currently only supports compare a single execution log for a test. There is a need however to compare multiple artifacts (like signature contents as well) of a test execution. Future versions of RiVer Core may include these features.
2.6. Test Report Generation
Once the test results are obtained and updated in the test-list, an HTML report containing
information of each of the above steps is generated for the user. The automatic browser pop-up can
be disabled by setting the open_browser parameter to false in the input config.ini file.
Each plugin run (generator, dut or reference) also creates a json report of the run which can easily be populated into html files for better visualization.
2.7. Future Work
Currently the RiVer Core framework depends on the log based comparison to decide on whether a test passed or failed. While this works for most scenarios, for larger tests the logs can soon become huge where the file-io itself starts to consume large amounts of time thereby increasing simulation time significantly. This limitation further requires that the architectural state dump occurring per instruction is kept as low as possible to keep the sizes of the logs as small as possible. Thus certain side-effects and corrupted architectural state (like wrongly updating multiple registers on an instruction commit) cannot be easily found. Furthermore, such framework cannot be ported to FPGAs either for accelerated verification.
To alleviate some of the above limitations (to a certain extent), RiVer Core plan to add the following two variant methodologies. Note there are just proposals and actual implementations of the idea may vary significantly that the description provided below:
2.7.1. Self-checking Tests
The below diagram highlights the flow of enabling self-checking tests in RiVer Core.
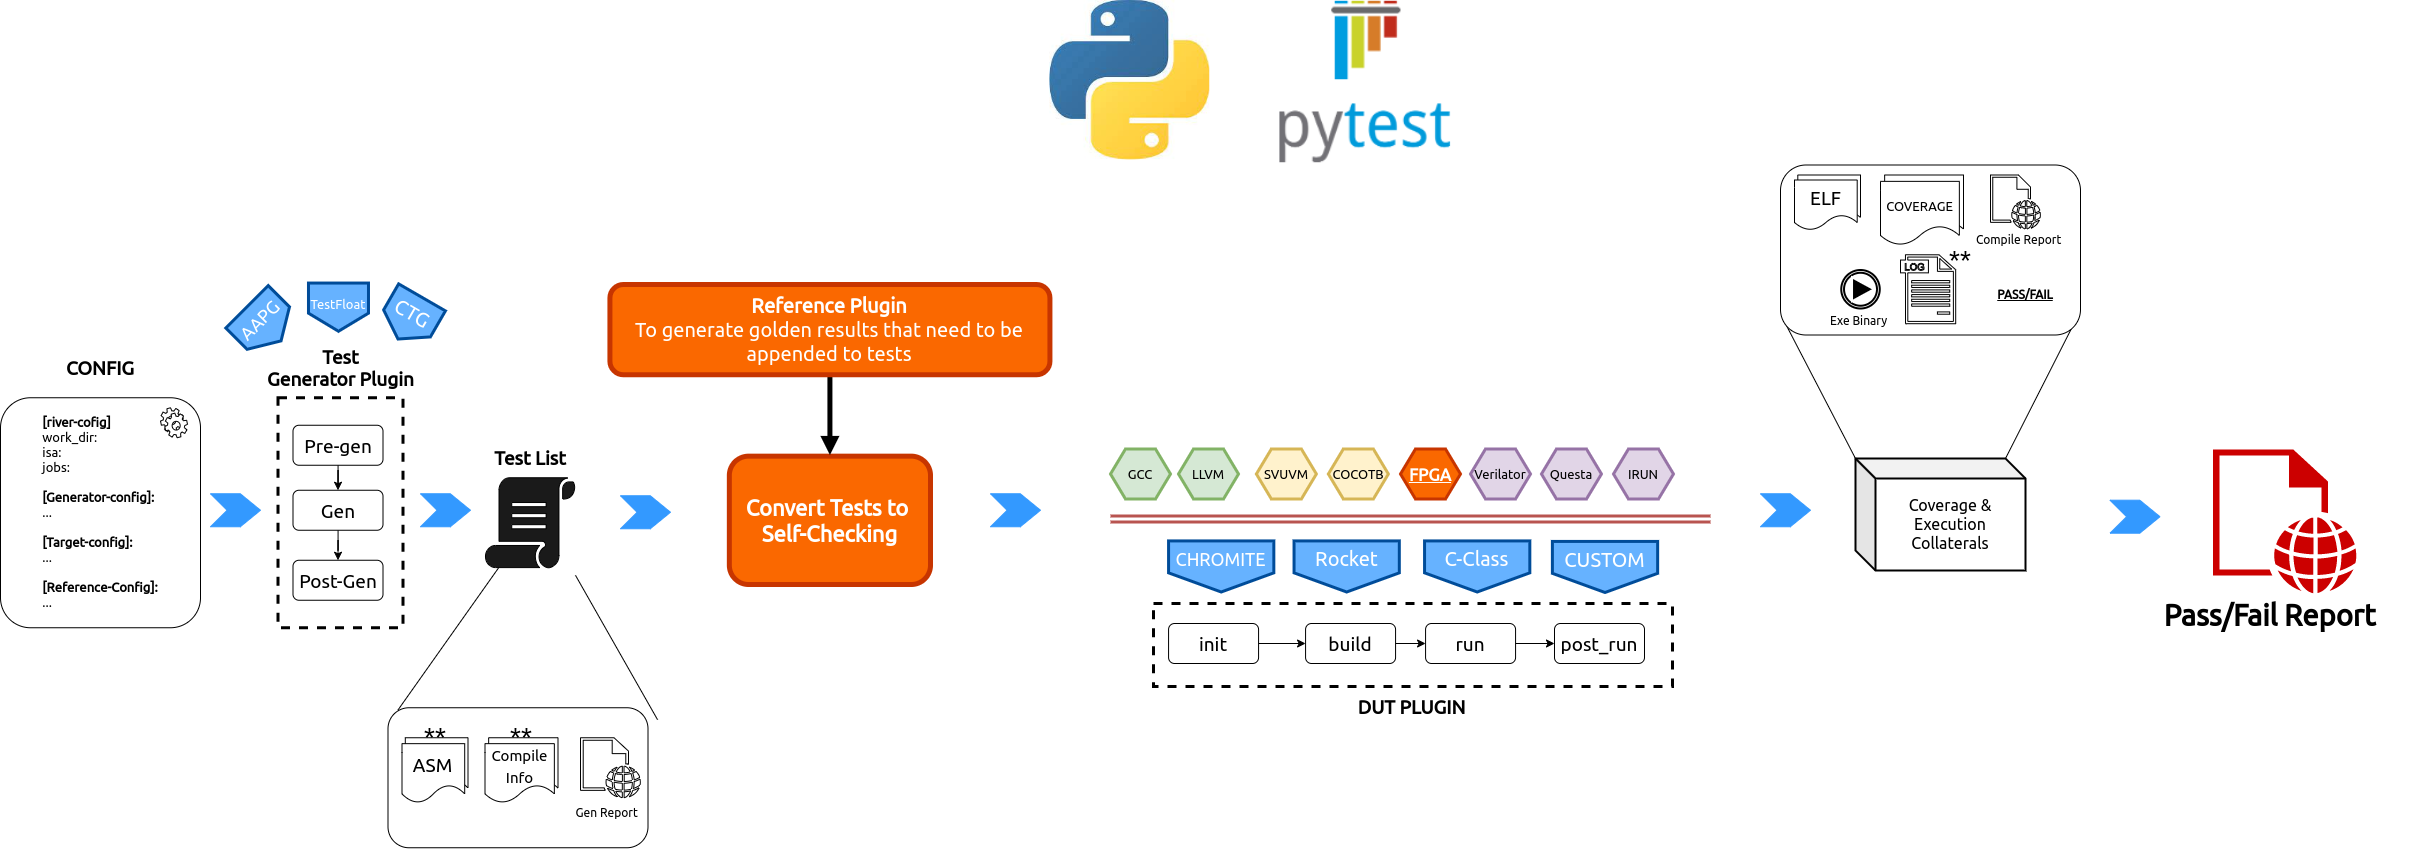
Fig. 2.4 RiVer Core Self Checking tests Methodology.
There are two major differences in this flow as compared the conventional flow presented earlier:
The generated tests are modified to become self-checking in nature.
The tests are run on the target only - which could now be FPGAs as well.
To make a test self-checking would mean the results of operations must be embedded in the test itself. However, embedding the result of every op will result in a huge memory requirements and will also reduce the quality of the test significantly. We therefore adopt a similar methodology adopted by AAPG, wherein at frequent intervals a checksum function is called which calculates the checksum of the required architectural state and checks if they match the golden value of the checksum at that point.
To generate the golden checksum values, we run the test on a reference plugin first and then append the golden results back into the test. Since these checksum functions are nothing but regular assembly/c functions a simulator does not require any new features other than to dump out the golden checksum results into a file.
To call a checksum function one can either use the jump instruction to directly jump to the
checksum function. We would rather prefer to use an ebreak instruction where the checksum can
now act as a regular ISR routine.
At the end of tests, if all checksums have matched, either a console write can be performed or a specific memory region can be updated with a unique value to indicate if the test has passed or failed.
From the above definition and flow, it is obvious on FPGA emulation platforms can be leveraged to perform accelerated testing of the design.
To convert a test into self-checking the following needs to be done for each test:
Add calls to checksum functions periodically in the original test
Create a memory region which can save the golden checksum values generated by the reference plugin
Append code section of the test to include the checksum functions and include a pass fail indication logic as well.
It is expected that a majority of the tests can be made self-checking using the above ideas.
2.7.2. Support for Step-Compare
In the above scheme the frequency of the checksum calls defines the confidence in the design and test. To gain confidence, one would like to test at almost every instruction, which can turn out to be counter productive for self-checking tests.
Also, the current framework (and the self-checking framework) does not support testing of asynchronous events like external interrupts on the target. Testing these features requires mimicking these asynchronous events on the reference model at the exact same architectural instant as seen by the target.
To enable such capabilities, we propose to support a ‘step-n-compare’ flow where the target and the reference model are instantiated in the same test environment (like SVUVM, COCOTB, etc) and are synchronized such that any architectural update on the DUT is compared with a similar update occurring on the reference model. This allows significantly granularity of checks and also enable testing of asynchronous events.

Fig. 2.5 RiVer Core Step Compare Methodology
More details on this environment will come soon !